
This post is part of a series on chlorophyll! Check out our previous post about how to easily extract chlorophyll from spinach and use it as a paint. Using a black light, you can also observe the beautiful red/pink fluorescence of chlorophyll, too! This post is how to further purify chlorophyll through a technique called liquid-liquid extraction or solvent extraction. Don’t be intimidated by the name! You are totally capable. This can be done with common, inexpensive things from your kitchen and it’s a great way to learn about solubility, polarity, and the way chemists approach problems. Younger kids will not grasp the concepts of polarity and solubility, but they can track the location of chlorophyll throughout the experiment (through color) to begin to learn about these concepts.
This tutorial is written for the parent or educator. There is a section called “A quick science lesson” to help give you a background to present this to a class or your kids. You can go as little or as much into the details as you want, so this project can be done with a large age range of kids.
Overview
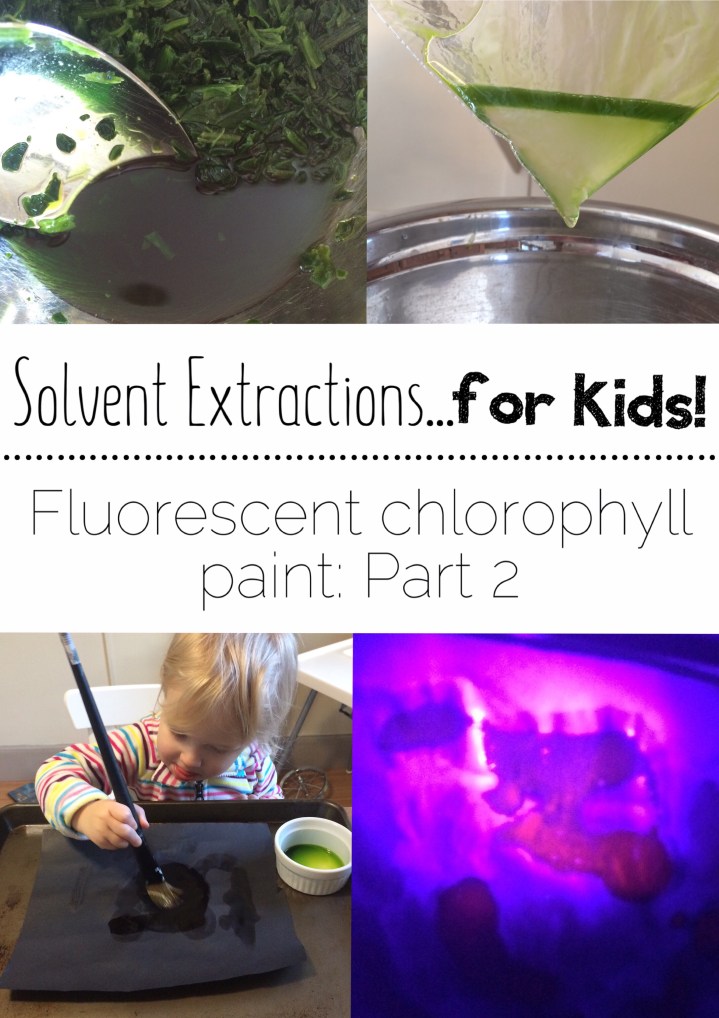
In the first part of this project, you will use rubbing alcohol (isopropanol) to extract chlorophyll from crushed spinach leaves. You can then transfer the chlorophyll to vegetable oil through liquid-liquid extraction using a plastic zip-lock bag to substitute for a special piece of equipment called a separatory funnel (see picture below). Our chlorophyll-in-isopropanol solution began to clump after two days, whereas the chlorophyll-in-oil solution will keep for 6-8 weeks. It is also easier to see the fluorescence when painting with the oil solution, as it needs to be wet in order to get the brightest fluorescence.


How do chemists use this technique?
When chemists have a solution with several different molecules in it, they often need a way to isolate their molecule of interest. This happens when they are trying to make a molecule and they need to remove it from the other ingredients (i.e. reactants, catalysts, solvents) or when they have a target molecule in a crude solution from a system they are trying to study, like trying to purify DNA from blood or contaminants in water. There are many techniques chemists and biochemists can select from to try to purify their target molecule, and solvent-solvent extraction is one of them. This technique separates different molecules based on their differing physical properties, namely polarity and solubility.
A Quick Science Lesson
Polarity
Molecules are made of atoms. The atoms within a molecule share electrons (which have negative charges). The atoms, however, do not share the electrons equally. Electrons tend to spend more time around some specific atoms, like oxygen and chlorine, more than others, like carbon. This unequal sharing causes a partial negative charge to build up around the atoms with more electrons. When this happens, this molecule may be considered “polar”. If the atoms in a molecule share electrons somewhat equally, the molecules are called “non-polar”. Polarity is a spectrum, so some molecules are very polar, some are kind of polar/non-polar, and some are non-polar. In large molecules, part of it may be polar and part of it may be non-polar (this is how soap works!).

In the first example above, the first molecule is non-polar because there are no atoms that steal the electrons, but the second molecule is polar because electrons are more attracted to that pink “O” atom (oxygen). Think of it as making the molecule lopsided with electrons. In the second example, the first molecule is non-polar. Even though “Cl” or chlorine is pretty “electronegative” (AKA attractive to electrons), the molecule as a whole is non-polar because the electrons are being pulled symmetrically around the molecule. The second molecule has two chlorine atoms replaced by carbon atoms. This molecule is polar because the electrons are being pulled to one side of the molecule more than the other.
Solubility
A little grain of sugar is actually trillions of sugar molecules arranged in a crystal. When you dissolve the sugar (the solute) in water (the solvent), the water molecules are taking the individual molecules in the crystal and surrounding each of them. Try to imagine this in your head. This breaks up the crystal and causes the individual sugar molecules to be suspended in the water. The water molecules want to surround the sugar molecules because they are both polar molecules, and polar molecules are attracted to other polar molecules. If you are teaching this as a lesson, try having the students draw a solute in a solvent.
When you try to dissolve oil in water, they won’t mix, right?. This is because oils are non-polar while water is polar. The water molecules are much more attracted to each other than the non-polar oil molecules, so you can mix all you want, but the water molecules will end up next to water molecules again when things settle down.
Chemists have a saying “Like dissolves like.” This is a rule of thumb to say that polar molecules dissolve other polar molecules and non-polar molecules will dissolve other non-polar molecules.
How this relates to our project
Take a look at chlorophyll below. It is not soluble in water, even though it does have polar bonds and polar functional groups (the N-Mg bonds, and basically all the O bonds (oxygens) are polar). These bonds make chlorophyll have some polar character, but generally, the molecule is non-polar, especially because of the long carbon chain hanging off the right side in the image. (The vertex of each zig-zag is a carbon atom). We know this because chlorophyll is generally more soluble in non-polar solvents. In the picture of triolein below, a major component of many vegetable oils, do you see all those carbons connected in rows? Doesn’t that kind of look like the chain on chlorophyll? Remember “like dissolves like”? Do you think chlorophyll is soluble in vegetable oil? …It is!


We first, however, are going to extract the chlorophyll in isopropanol (rubbing alcohol). Isopropanol is less polar than water, but more polar than oil, so somewhere in the middle on the polarity scale. It is actually soluble in both water and some oils. We use isopropanol to do the initial extraction because the chlorophyll in plants (spinach) is bound to a special protein that keeps it soluble in water. If you use oil or another polar solvent to start with, you wouldn’t get a lot of chlorophyll out. The isopropanol is able to solubilize the protein-bound chlorophyll. Unfortunately, the protein soon unfolds, letting go of the chlorophyll. (If you need a primer for proteins, try The Baby Biochemist: Proteins (Volume 3).) This releases the chlorophyll into the solution. Chlorophyll will eventually clump together in the isopropanol and fall out of solution because it is not very soluble in isopropanol. If we transfer the chlorophyll to oil, it will stay dissolved in the oil much longer because it is more soluble in oil. Also, since oil takes much longer to dry than rubbing alcohol, you will be able to see fluorescence for longer.
Supplies
- see this post for the isopropanol extraction
- plastic Ziploc Sandwich Bags
(bigger is fine, too)
- vegetable/canola oil
- water (tap is fine)
- pin/ safety pin
- measuring cups and spoons (optional, you can eyeball all the measurements)
- bowls or cups
Warning: Always wear safety goggles. Do not get isopropanol into your eyes or mouth. Isopropanol is flammable so do not work near open flames. Only do this activity with responsible children. Consider doing a demo if it’s a large group. Do not eat the chlorophyll solutions or left over spinach.
Procedure


1. Extract the chlorophyll (and various other isopropanol-soluble proteins and compounds) according to this post.
2. Pour about 1/4 cup of the green isopropanol solution into the ziplock bag and tilt the bag so the solution gathers in a bottom corner. (Grab a notebook or paper and record your observations.)
3. Add 1 tablespoon of vegetable oil to the ziplock bag and agitate with your fingers. Look at the solution now and make notes.
4. Add a 1/4 cup of the water.
5. Try to squeeze out most of the air, then zip the bag shut. Take note of the liquids.
6. Agitate or shake the liquids vigorously. Take note of the liquids right when you stop shaking, and as they settle.
7. The liquids should now have separated into two layers. The top should be green and the bottom should be a brownish-yellow. Where do you think the oil is? The water? The isopropanol?
8. Poke a hole with a pin in the very tip of the corner of the bag and hold it over a bowl to drip. If it’s going too slowly, poke another small hole, and open the top of the ziplock bag.
9. Wait until the bottom yellowish layer drains off and get ready to pinch the tip of the bag. When we did it, the draining actually stopped by itself at the green layer, but just in case, get ready to pinch it.
10. Tilt the bag so the chlorophyll liquid goes to the other corner (with no hole in it).
11. Add another 1/4 cup water to that corner, seal the bag, pinch the hole in the other corner, and agitate the solution with your fingers. Note what is happening with the liquids now. What color are the layers?
12. Tilt the bag so the liquid is over the corner with the hole and drain the bottom layer again.
13. Transfer the green liquid to a cup or bowl. You successfully transferred chlorophyll to the oil! (This isn’t a pure solution so don’t eat it, but there’s tons of chlorophyll in it.) You can paint with it now, and play around with the fluorescence with a black light. You can also try to make a lava lamp-type thing by pouring some of the chlorophyll-oil into water, shake it, then watch it separate under a black light!

Discussion
Oil is non-polar, water is polar, and isopropanol is somewhere in between. We use these properties to remove chlorophyll from the isopropanol to get the chlorophyll into the oil. When you mix the oil with the chlorophyll-isopropanol solution, the chlorophyll molecules begin to be enveloped by the oil molecules instead of the isopropanol molecules. You can’t really see this happening since the vegetable oil is still soluble in the isopropanol. Take a second to imagine this happening in your head. As an exercise for older kids/teenagers, they can try to draw a picture of what they think is happening at each step.
When you add the water, the isopropanol is more soluble in water than the vegetable oil, so it separates into the water layer. Water and vegetable oil, as you know, do not mix, so now the vegetable oil and chlorophyll are in one layer, and the water and isopropanol are in the other layer. (Pause to imagine this, or draw a picture). You do a second extraction with the water to get whatever isopropanol that is left in the oil to come out (remember that isopropanol is still soluble in oil, it just prefers to be in water). It is also nice so you can see the difference between the yellowish-brown water of the first extraction and the clear water of the second extraction. That means you got rid of a lot (not all) of impurities!
Lessons
- Molecules can be soluble in several different solvents.
- Other molecules can be insoluble in those solvents.
- You can use the differing properties of molecules, such as solubility, to separate them from other molecules.
- We purified the chlorophyll from other molecules that were polar/ not-oil-soluble, but…
- …molecules that were also non-polar in addition to chlorophyll would have also transferred to the oil phase. So we cannot assume this is a pure solution, even though it’s bright green. If you wanted pure chlorophyll you would need to do further purifications.
Take your time with this project. I think it is so helpful if you slow down and really imagine or draw what is going on with the molecules at each step to help understand the concepts. If you are interested in transforming this project into a lesson plan for your class or homeschooled children, please send me an email at thebabybiochemist@gmail.com!
Enjoy!
Science is Social!
Take pictures of your chlorophyll projects and post it to Instagram or Facebook! Be sure to tag @TheBabyBiochemist and we will try to feature your work! Science is social and it relies on everyone sharing, discussing, and learning from everyone else! We hope you have a blast doing this project!

